








Installation Manual
S16 Wire-In Manager
Install, wire, configure, and operate the Aminiti S16 in-line device.
Product Description
Aminiti provides monitoring, management and billing functionality to any electrical outlet, circuit, fixture or appliance. The Aminiti S16 is designed for fixed installations in an approved junction box or enclosure, placed in-line between the power source and load.
Features
Zero-infrastructure Billing and Access-control
Aminiti devices can be activated, monitored and managed without the need for wireless network infrastructure, purely through secure communication with the Aminiti app on an authenticated user's mobile device.
Cloud-based monitoring and management
Where Wi-Fi internet connectivity is available, Aminiti devices can connect directly to the Aminiti cloud-based management platform and enable real-time remote monitoring and management features.
Flexible Management
The Aminiti cloud management platform and mobile app offers an extensive suite of options to provide a tailored solution for your application.
Versatile and Compact Form Factor
The Aminiti S16 is designed to be installed in existing enclosures and junction boxes. Where regulations permit and sufficient enclosure volume exists, the device can be installed in the same box as a receptacle or other fixture.
Easy Installation
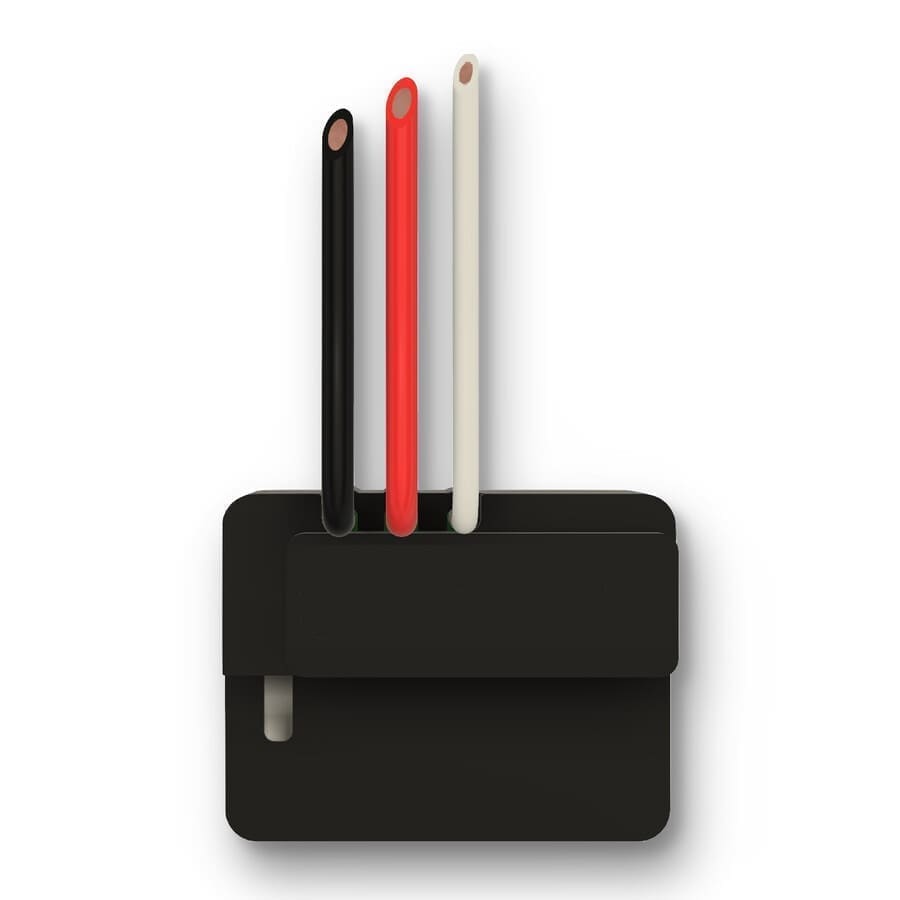
The Aminiti S16 has only 3 terminals to connect — LINE, LOAD, and Neutral.
Specifications
| S16 | |
|---|---|
| Model | S16 |
| Voltage | 110–240 VAC, LINE-NEUTRAL or LINE-LINE |
| Frequency | 50–60 Hz |
| Rated Loads | 240 VAC, 20 A Resistive 120 VAC, 20 A Resistive 120 VAC, 1/2 HP Motor 120 VAC, 3 A Pilot Duty 120 VAC, 12.5 A Tungsten 120 VAC, 5 A E-Ballast 120 VAC, 15 A Receptacle |
| Max OCPD or Breaker | 20 Amps |
| Dimensions | 55 mm × 40 mm × 24 mm |
| Volume | 45 cm³ (2.75 in³) |
| Mass | 55 g |
| Operating Temperature | −20 °C to +55 °C |
| Storage Temperature | −40 °C to +70 °C |
| Agency Approvals | UL File E524862 UL 60730-1 CSA E60730-1 |
Installation
General Considerations
The Aminiti S16 must be installed in an approved electrical enclosure. Ensure that box-fill requirements are met when planning your installation. If existing enclosures do not provide sufficient extra volume to safely accommodate the Aminiti device along with new and existing wiring, install a secondary junction box to house your Aminiti device. Alternatively, install an approved box extender to provide sufficient volume for the device. Consult your authority having jurisdiction for local code requirements.
For best wireless performance and range, use a plastic enclosure. Aminiti can work in a metal enclosure, but will need to be located within 12 metres of a Wi-Fi access point if Wi-Fi connectivity is required. For a Zero-infrastructure installation, locate the Aminiti device within 4 metres of where users are likely to operate it with their mobile device.
Wi-Fi range issues can be resolved by installing a Wi-Fi range extender or an Aminiti mobile network adapter near your Aminiti installation.
Before You Start
Download and install the Aminiti mobile app prior to installing. Use the app to create an account for managing your Aminiti devices. Ensure that your mobile device has internet connectivity at the installation location.
Register your Aminiti device
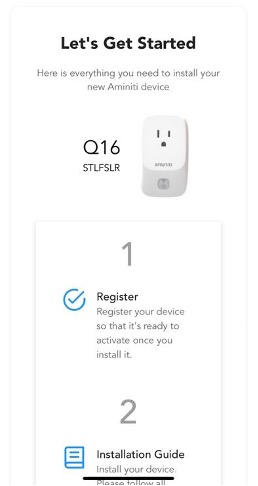
In the Aminiti mobile app, under the Account Settings menu, choose Add New Aminiti Device. Scan the QR code on the Aminiti product label. Configure the device settings to suit your application. All settings can be changed at any time. Tap Done when complete.
Disconnect Power
Ensure that all branch circuits within the enclosure that you will install your Aminiti device into have been de-energized by turning OFF the circuit breakers that feed them. Use a non-contact voltage tester to verify that the circuits are disconnected.
Prepare the Enclosure
DISCONNECT POWER TO ALL CIRCUITS WITHIN THE INSTALLATION ENCLOSURE. USE A NON-CONTACT VOLTAGE TESTER TO VERIFY.
Your Aminiti device is intended to be installed in-line between the source branch circuit and the load to be managed.
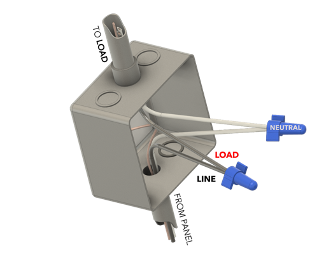
Locate and disconnect the LINE from the LOAD conductor
Inside the enclosure, locate the branch circuit (LINE) conductor that feeds the receptacle, fixture, or other load that is to be managed by your Aminiti device.
Disconnect the LINE conductor from the LOAD power entry conductor or terminal.
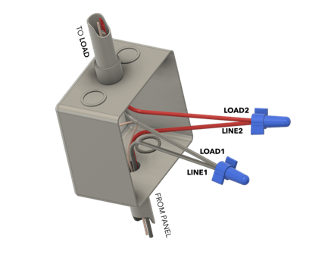
If the load is a split-phase device (240 V or 208 V), you will find two LINE conductors feeding the load. You will only need to disconnect one of them.
Connect the conductors to the Aminiti device
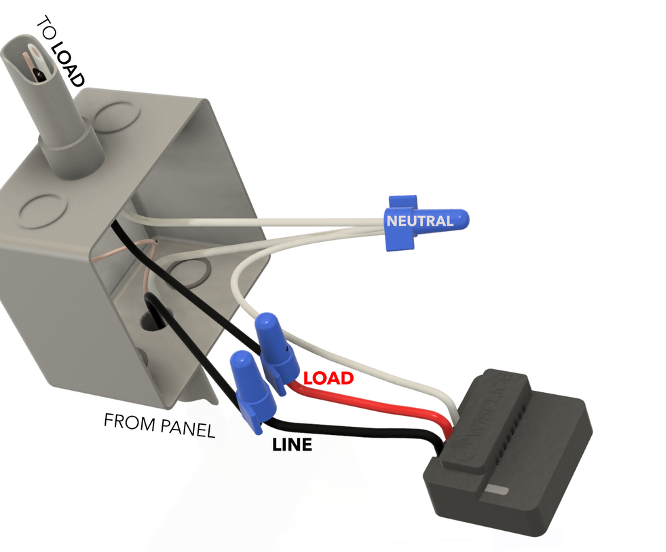
LINE and LOAD conductors
S16
The Aminiti S16 is equipped with three wire leads.
- Strip 20 mm of insulation from each conductor.
- Connect the BLACK (LINE) conductor to the branch circuit (LINE) conductor (identified above).
- Secure with an approved wire connector.
- Connect the RED (LOAD) conductor to the conductor that feeds the load.
- Secure with an approved wire connector.
Reference conductor
LINE-NEUTRAL Loads (120 V in North America / 230 V elsewhere)
The WHITE REFERENCE conductor on your Aminiti device must be connected to the NEUTRAL conductor(s) in your enclosure. Multiple WHITE neutral conductors are typically spliced in a single wire connector. Remove the wire connector and connect the WHITE reference to the others. Secure with the wire connector.
LINE-LINE Loads (208/240 V in North America)
The WHITE REFERENCE conductor on your Aminiti device must be connected to the second LINE conductor(s) in your enclosure. Splice the WHITE REFERENCE conductor to the second LINE conductor and secure with a wire connector.
Complete the installation
Place the Aminiti device in the enclosure
Carefully place the Aminiti box in the enclosure, neatly folding any excess wire into the enclosure. Do not apply excess force. If you experience difficulty fitting the Aminiti device into the enclosure:
- Use a larger enclosure
- Add an extension ring to the enclosure
- Install the Aminiti device in a separate enclosure
Secure the enclosure with an approved cover plate
Configure and test the Aminiti device
Restore power to the branch circuit
Activate the appropriate breaker.
Launch the Aminiti mobile App
Tap the User Settings icon and select Manage My Devices. If you successfully registered the device using its QR code prior to installation, it should appear under the heading Newly Installed. You can now select the device and configure it as desired.
Ways to use Aminiti
Aminiti gives you a lot of flexibility. Here are a few main ways to use Aminiti:
Control Access to an Electrical Outlet or Device
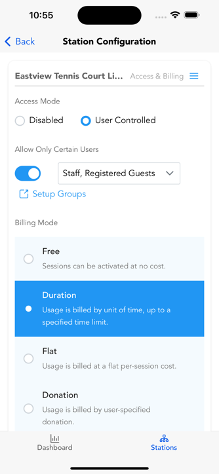
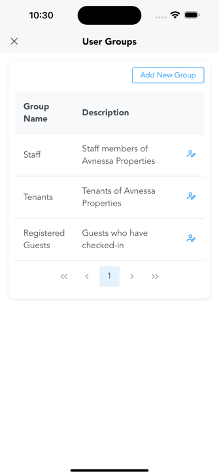
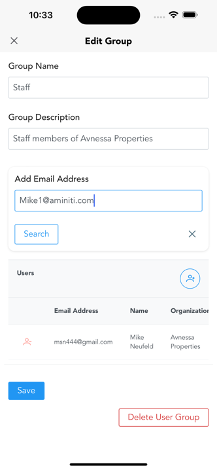
You can create one or more groups of users and select which groups have access to your station. To do this:
- Set the Access Mode to User Controlled.
- Enable Allow Only Certain Users.
- Create a Group and select it to give its members access to your station.
Create a pay-per-use electrical outlet or device
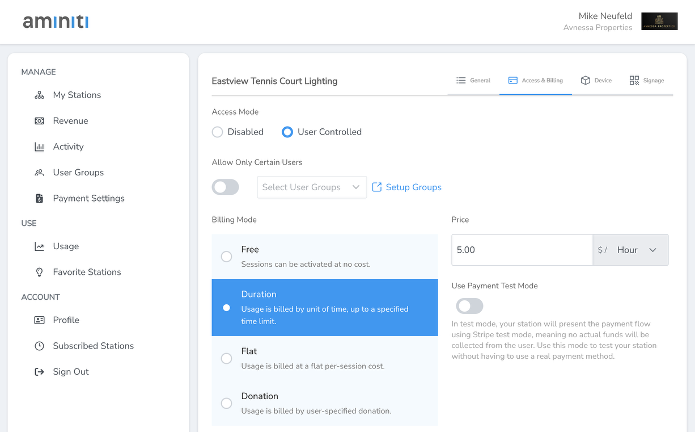
You can set up your station to be activated by credit card payment or with Apple Pay or Google Pay. Select User Controlled as the Access Mode.
Then, set the Billing Mode. This can be Duration (by hour or minute), Flat (fixed price per session), or Donation (user picks a price). Set the Price and Tax Settings, if required. You may initially set Use Payment Test Mode to test the station without needing to use a real payment method.
Bill a tenant or other individual for all usage
If your station is going to be used by just one user and you want to bill that user monthly for all usage, select Usage Plan as the Access Mode.
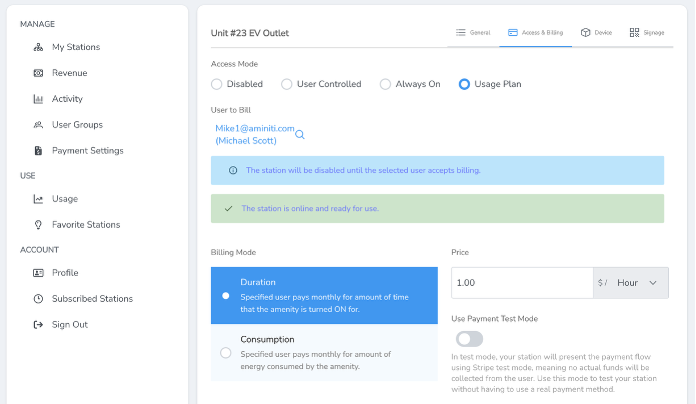
Usage Plan stations bill by Duration: the user is billed for time that the station is detected to be ON. This threshold is fixed at 40 watts.
You'll need to enter the email address of the user you want to bill. If the user does not have an Aminiti account already, they'll be invited to join.
Once the selected user signs in, they'll see the station under their Subscribed Stations, with a status of Pending. The user must agree to the Usage Plan you've configured and provide a payment method.
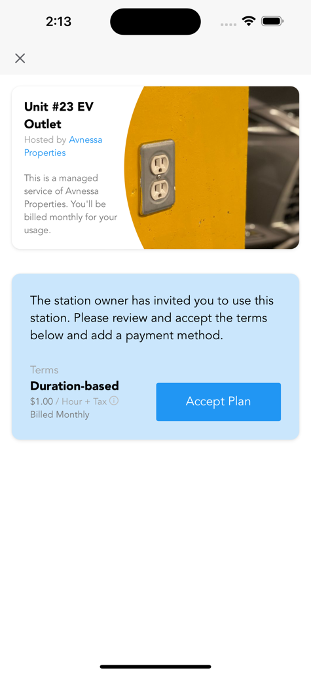
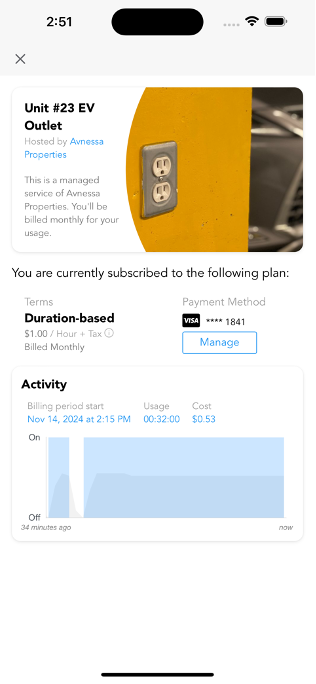
Once the user accepts the plan and provides a payment method, they'll be able to view their usage and costs at any time.
The Aminiti App
You'll need the Aminiti mobile app to fully configure your Aminiti device. Download it from the iOS App Store or Google Play Store.
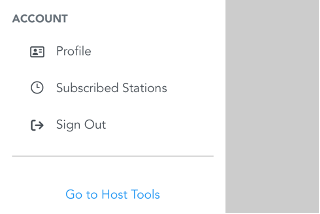
Once you sign up for an Aminiti account, navigate to Host Tools in the main menu. This is where you can add and configure an Aminiti station. You can also access this by simply scanning the QR on the device using your Camera app.
Adding an Aminiti Device
Simply use your smartphone's camera app to scan the Device Label located on your new Aminiti device.
Or tap Add Aminiti Device in the Aminiti mobile app.
Configuring a Station
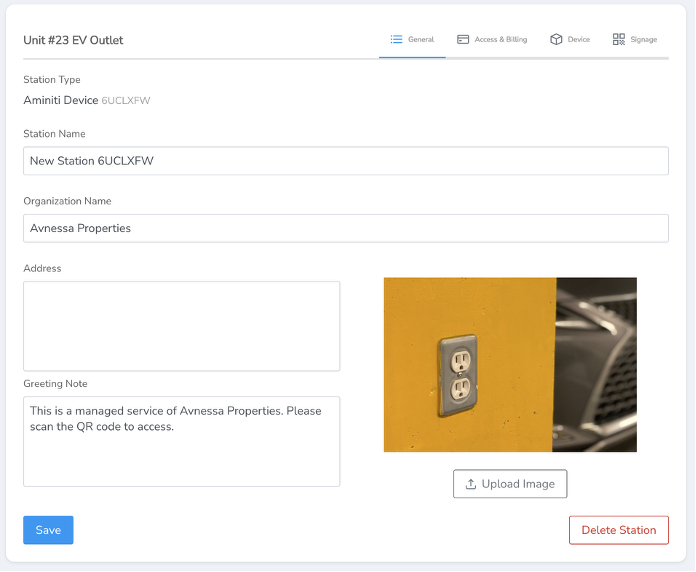
General settings include the station name and the name of your organization. Provide an image to easily identify your station, and a greeting note that users will see. These will all help your users find, identify, and trust your stations.
Access and Billing
These settings allow you to control access to your station, how it is billed, and whether time limits or schedules are applied. Most of these settings are shown in Ways to use Aminiti.
Device
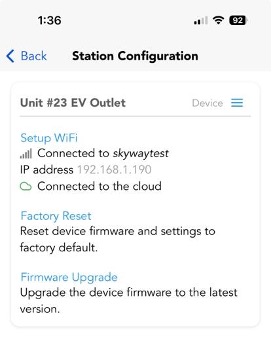
The Device panel allows you to connect your Aminiti device to a Wi-Fi network. This is important for Usage Plan operation, so the device can provide usage information in real-time.
You can upgrade your device firmware from the Device panel. You'll need to stand within 10 feet of the device to initiate a firmware upgrade.
If your device has become unresponsive, you can perform a Factory Reset of the device from the Device panel. This will reset all settings and restore the device to its original settings. You'll need to stand within 10 feet of the device to perform a Factory Reset.
Suggested Applications
Aminiti is versatile. There are many ways to use it and many features to suit your application. Here are a few of the most common:
Electrical Outlet in a Multi-Tenant Parking Facility
Manage and bill for the use of common-property electrical outlets, especially for charging Electric Vehicles.
| Device Location | In outlet junction box, or in dedicated enclosure beside outlet |
| Access Mode | User-Controlled: For cases where multiple users could be using the outlet. Each user activates their session using the Aminiti app and pays using prepaid funds from their account. Recommended settings: Auto Close on Idle — Ends the session automatically after negligible current is detected for 1 minute. |
| Billing Mode | Duration: Charge for use of the service per hour. Optional Settings: Step Pricing — Allows users to select one of three different maximum current levels with pricing scaled accordingly. Account-free access: With Allow Only Certain Users off, any guest can use the station without an Aminiti account — they reach it by scanning a posted QR code or from nearby devices in the app, and pre-pay with a credit card, Google Pay, or Apple Pay. |
Public Recreation Amenity
Examples: Tennis Court / Track / Park Lighting, Outdoor heat lamps, Street Vendors, Food Trucks.
| Device Location | In lighting control enclosure, branch circuit junction box, or in dedicated enclosure |
| Access Mode | User-Controlled: Each user activates their session using the Aminiti app and pays using prepaid funds from their account. Recommended settings: Auto Close on Idle — Ends the session automatically after negligible current is detected for 1 minute. Scheduled Operation: Specify daily opening and closing times for the service and disallow use at night. Time Limit: Prevent excessive use. |
| Billing Mode | Duration: Charge for use of the service per hour. Account-free access: With Allow Only Certain Users off, any guest can use the station without an Aminiti account — they reach it by scanning a posted QR code or from nearby devices in the app, and pre-pay with a credit card, Google Pay, or Apple Pay. |
Shared Amenities in Residential Buildings
Examples: Car Wash / Vacuum Stations, Laundry Machines, Saunas, Patio Heating.
| Device Location | In outlet junction box, control enclosure, branch circuit junction box, or in dedicated enclosure |
| Access Mode | User-Controlled: Each user activates their session using the Aminiti app and pays using prepaid funds from their account. Recommended settings: Auto Close on Idle — Ends the session automatically after negligible current is detected for 1 minute. Scheduled Operation: Specify daily opening and closing times for the service and disallow use at night. Time Limit: Prevent excessive use. |
| Billing Mode | Duration: Charge for use of the service per hour or minute. Account-free access: With Allow Only Certain Users off, any guest can use the station without an Aminiti account — they reach it by scanning a posted QR code or from nearby devices in the app, and pre-pay with a credit card, Google Pay, or Apple Pay. |
Tenant Equipment on Common Property
Examples: HVAC, EV Charging, Vending Machines.
| Device Location | In outlet junction box, control enclosure, branch circuit junction box, or in dedicated enclosure |
| Access Mode | Fixed: All usage is billed to a single user in a monthly invoice. Optional settings: Scheduled Operation: Specify daily opening and closing times for the service and disallow use at night. |
| Billing Mode | Duration: Bill for use of the service per hour or minute. Recommended Setting: Pause when Idle — Bill the user only for time when significant current flow is detected. Provides a more accurate reflection of the value delivered to the user. |
Contact Support
We're here to help you get the most of your Aminiti device. Visit https://www.aminiti.com/support to find more information or contact our support team.
Safety Information
Warnings
IMPORTANT! READ THIS ENTIRE DOCUMENT BEFORE INSTALLING OR USING YOUR AMINITI DEVICE. FAILURE TO DO SO OR TO FOLLOW ANY OF THE INSTRUCTIONS AND WARNINGS IN THIS DOCUMENT CAN RESULT IN FIRE, ELECTRICAL SHOCK, SERIOUS INJURY OR DEATH. YOUR AMINITI DEVICE MUST BE INSTALLED BY A QUALIFIED ELECTRICIAN, AND IN ACCORDANCE WITH LOCAL ELECTRICAL CODES AND ORDINANCES.
Do not install or use your Aminiti device near flammable, explosive, or combustible materials, chemicals, or vapors. Turn off input power at the circuit breaker before installing or maintaining your Aminiti device. Use your Aminiti device only within the specified operating parameters. Stop using and do not use your Aminiti device if it is defective, appears cracked, damaged, or fails to operate. Do not attempt to open, disassemble, repair, tamper with, or modify your Aminiti device. Your Aminiti device is not user serviceable. Contact Aminiti Technologies for any service or replacement.
Do not use your Aminiti device in wet locations, or connect other devices to your Aminiti device in wet locations. Do not insert foreign objects into any part of your Aminiti device.
Aminiti is not an Over-Current Protection Device or Circuit Breaker. Your Aminiti device must be installed on a branch circuit protected by an OCPD (circuit breaker) rated at no greater than the "Max OCPD or Breaker" listed in the specifications. Any conductors installed on the LOAD side of your Aminiti device must be sized appropriately for the OCPD rating.
Aminiti is not a Ground-Fault Interruptor (GFI). Applications requiring GFI protection must incorporate an approved GFI breaker or receptacle.
Aminiti is not an Arc-Fault Circuit Interruptor. Applications requiring AFCI protection must incorporate an approved AFCI device.
Cautions
Incorrect installation and use of your Aminiti device could damage it. Any resulting damage is excluded from the warranty. Do not operate your Aminiti device in temperatures outside its operating range of −20 °C to +55 °C.
Errors or Omissions
To communicate any inaccuracies or omissions in this manual, please send an email to: support@aminiti.com.
Regulatory Compliance Information
FCC Declaration of Conformity
This device complies with Part 15 of the FCC rules. Operation is subject to the following two conditions: (1) This device may not cause harmful interference, and (2) this device must accept any interference received, including interference that may cause undesired operation.
Radio and television interference
The equipment described in this manual has been designed to protect against Radio Frequency Interference (RFI). However, there are some instances where high powered radio signals or nearby RF-producing equipment (such as digital phones, RF communications equipment, etc.) could affect operations. If interference to your Aminiti device is suspected, relocate or turn off nearby electrical appliances before contacting Aminiti Technologies for assistance.
Important! Changes or modifications to this product not authorized by Aminiti Technologies could void the FCC compliance.